Coaching Park Rats on Rails: The Daily
Grind
by
Chuck Roberts
Grinding rails is a fun intermediate move for your terrain
park students who are chomping at the bit to learn new freestyle hits. The
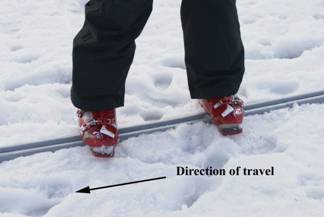
basic grind is performed by mounting a rail and skidding with the skis tips and
tails perpendicular to the direction of travel. Mastering a cool rail grind
puts a freestyle skier right in there in the hierarchy of the top park rats in
the terrain park. The basic rail grind
serves as a platform for a host of more advanced moves such as the change up
(Reference 1), and 360 off. Skills
learned from riding boxes and jumping will help your student get a grip on
riding rails. There is a degree of apprehension when a skier tries a rail for
the first time and rightly so. Adjusting to the behavior of skis skidding on
metal is foreign to the muscle memory of most of your students. In order to
reduce apprehension and set up your class for success, the classic theory of
stepping stone progressions is applicable.
THE GRIND
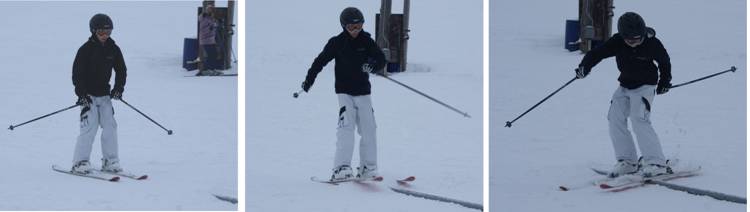
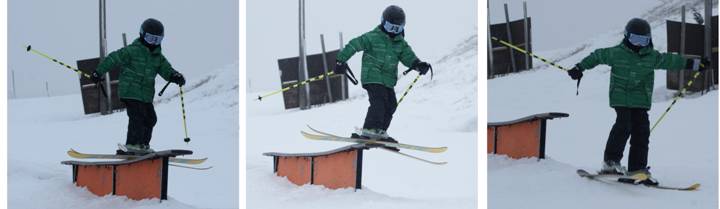
Figure 1 is a view of the basic grind in
a sequential format. During the approach (the A in ATML - approach, take-off,
maneuver, landing) the skier adjusts speed using a breaking wedge and lines up
with the feature as if intending to straddle the rail (Figure 1A). Focus is on
the end of the feature. Knees are flexed and feet about shoulder width apart. At
the ramp, preparation for the take-off is made by rotating the upper body in
the direction of rotation chosen by the skier. At take-off (the T in ATML) the
skis are rotated sequentially (what will become the trailing ski rotates first),
perpendicular to the direction of travel while the skier attains air (Figure 1B). It is not necessary, nor desirable, to get
big air at take off. Just enough air is needed to mount the rail, as too much
air results in a jarring landing which could cause difficulties in the maneuver
phase. When contact is made with the rail, the original body rotation is
checked with upper body counter-rotation and a slight semi A-frame stance on
the feature (Figure 1C). The skier grinds (M in ATML) on the ski surface under
the boot. A slight “Daffy” is appropriate to grip narrow rails and prevent
movement off the rail (Figure 1D). Near the end of the feature, the skier
unweights, and the stored energy from the lower body twist aligns the skis with
the direction of travel (Figure 1E), facilitating the landing (Figure 1F).
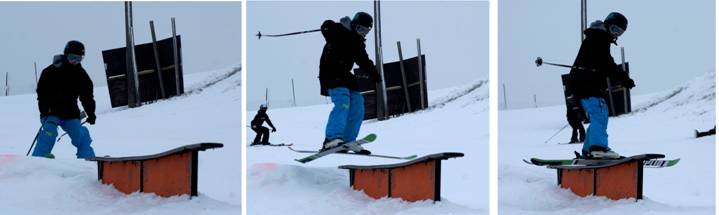
1A 1B 1C
1D 1E 1F
Figure 1
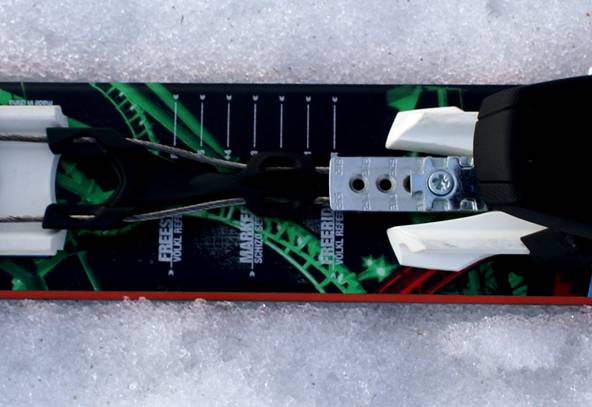
Figure 2
TECH TALK
Since the skis interact with a long
piece of steel in a manner unlike riding on boxes, some technical aspects of
equipment may influence the outcome of your class or coaching session:
Figure 2 shows a typical adjustable (for and aft) binding set-up for freestyle twin-tip skis. Bindings are set back for all mountain skiing. The bindings are set to an intermediate position for jumping and halfpipe freestyle moves and set forward for rail moves such as the rail grind, which is the subject matter of this article. Positioning boots over the center of the skis reduces the resistance to rotation (rotational inertia) of the skis, making it easier to mount a rail, and is the preferred binding location for rail hits. Many freestyle skiers also bevel the edges of their skis (Figure 3) just under the boot area. This tends to aid in grinding and reduces the chance of engaging an edge on the rail. Some skiers prefer a 6 degree bevel, some simply chamfer (round off) the edge to a preferred radius and others do nothing to the skis. It should be noted that there is no hard and fast rule as to what equipment to use and how it should be prepared. The equipment configurations in Figures 2 through 3 are guides to setting up equipment that may help your students achieve an awesome rail grind. As always, a ski helmet is highly recommended for rail moves.
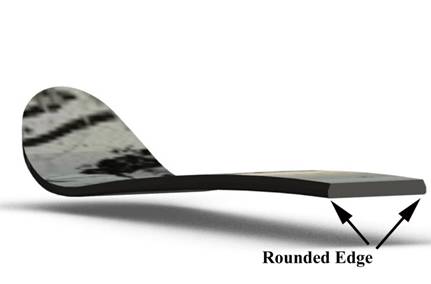
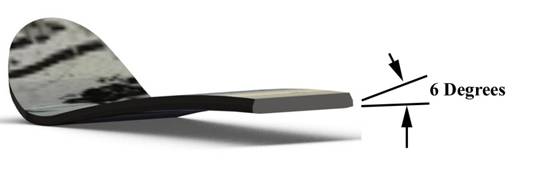
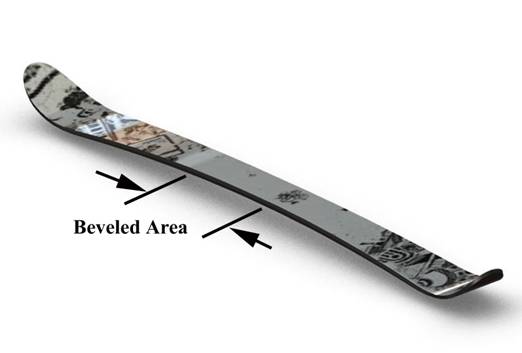
Figure 3
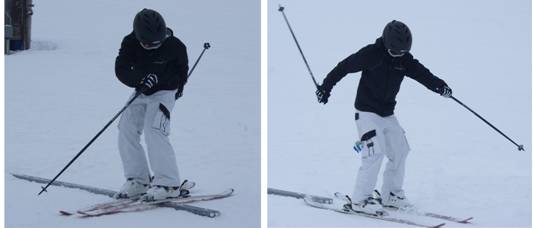
POSITIONING
At the introduction of your class, a workout, without
skis, on a small practice feature (References 2 & 3) is helpful. In Figure
4A, we see the semi A-frame stance where the lead leg is angulated slightly
with the leading edge higher than the trailing edge of the lead foot. This
reduces the chance of the lead edge engaging on the feature, as well as reduces
the body rotation when the perpendicular position on the feature is achieved.
Have your students run and jump (without skis) onto the rail into the position shown
in Figure 4A. It should be noted that
the jump should be minimal, just enough to lift the body onto a rail. The
leading foot is more heavily weighted than the trailing foot. Figure 4B shows
positioning on a rail with the leading edge of the leading ski raised. Center
of mass should be between the feet with more weight toward the leading foot.
Lateral location of the skier’s center of mass should be right over the rail with
the rail typically under the arch of the foot. The skier in Figure 4B is preparing
to dismount and is counter-rotating the upper body. His hips are reasonably
aligned with the feet, which aids in keeping the skis perpendicular to the
rail. Many rail skiers also have the shoulders aligned with the feet, but the
head is always looking at the end of the feature. Rotating the upper body, such
that the hips face the end of the feature, often results in the skier falling
off the rail as the skis attempt to realign with the upper body. The
skier in Figure 4B may look like he is slightly back, but he does have weight
on the leading ski. Remember that the photo is dynamic and that he is resisting
the grind drag force on the front ski.
4A 4B
Figure 4
4C
Figure 4
Figure 4C shows another common position used primarily
when a spin is expected on the rail, but is also used for a grind by some skiers
who can cancel body rotation using the upper body only. Left or right foot forward is a preference
left up to the skier often based on a feeling of comfort. Many freestyle skiers
prefer having their dominant leg forward, but either way is acceptable.
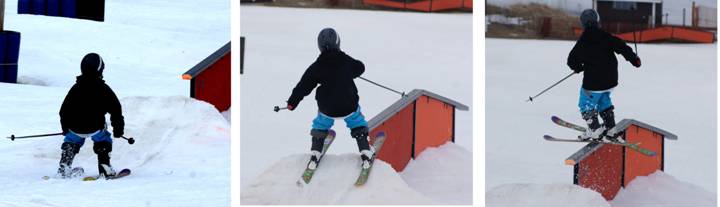
PRACTICE RAIL
Next, put on the skis and try the move on a small practice feature as
shown in Figure 5. Have the student approach in line with the feature, looking
at the end of the feature (Figure 5A). The take-off is achieved with a slight
hop to free the skis from the snow and counter-rotation to place the skis
perpendicular to the direction of travel (Figures 5B and 5C). Make sure the hop
is slight, as it is preferable to pop up onto the rail rather than come down
hard on the rail. Check for sequential rotation of skis with the trailing ski
rotating first to avoid crossing the front ski over the rear ski when mounting
the rail.
5A 5B 5C
5D 5E
Figure 5
Observe the grind, making sure the student’s boots are
over the rail (Figure 5D). For the landing, the student hops to unweight, and
the lower body unwinds to align the skis with the feature (Figure 5E). Check
for the boot positioned over the rail, the hips aligned with the feet and a
slight hop for landing. The hips remain aligned with the feet throughout the
sequence.
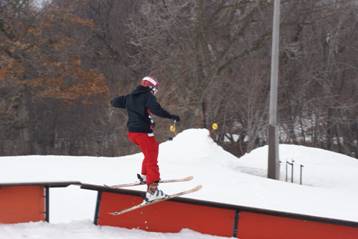
GRIND A SMALL WIDE RAIL
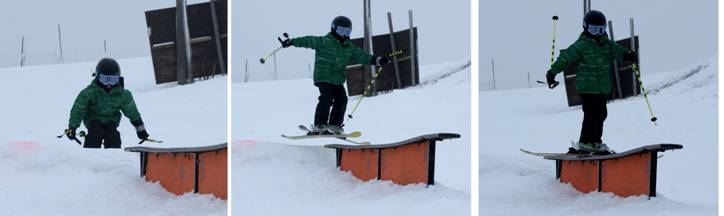
6A 6B 6C
6D 6E 6F
Figure 6
Now that you are satisfied with the skill demonstrated
on the practice feature, it is time to move on to the next stepping stone, a
small, relatively wide rail in the park. This will be the first time that your
class will actually be using the ramp to get air and mount the rail. A
combination of extension and lift from the ramp is appropriate to get on the
rail. Figure 6 is an example of a student performing this task. Figure 6A shows
adequate flexion in preparation for the take-off or pop. In Figure 6B, the
skier could use a little more rotary preparation for the take-off, as evidenced
in Figure 6C where the skier did not quite mount the rail with the skis
perpendicular to the direction of travel. This is a crooked grind (skis not
perpendicular to the direction of travel) which works on a wide rail, but can
cause difficulties on narrow rails. Despite these deficiencies, the skier does
grind the whole rail and lands with the skis aligned with the direction of
travel. His hips are aligned with the feet and the head is focusing on the end
of the rail.
There is a slight fear factor when launching
onto a rail for the first time. Emphasize weight toward the leading foot, since
leaning toward the rear can force the skis forward and cause a possible fall.
Practicing over the ramp without mounting the rail gives a feeling of the lift
expected from the lip, lessening the uncertainty when attempting to mount the
rail. As always, the body should project
forward slightly at the pop from the ramp to avoid landing back and having the
skis slide out from under the skier. Remember to emphasize approaching at a
nominal speed, since mounting at a slow speed may result in a stall or a roll
off the rail.
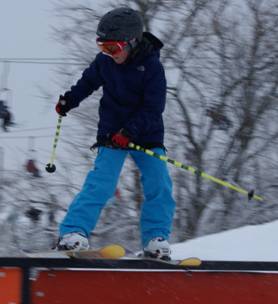
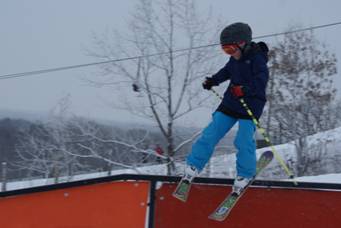
GRIND A HIGHER NARROW RAIL
Finally, take the class to a typical
narrow rail (2x6” tube) as shown in Figure 7. The skier approaches with
sufficient flexion, feet apart and center of mass facing the end of the rail
(Figure 7A) preparing for the pop at the lip. Upper body rotation is shown in
Figure 7B prior to the lip. At the take-off, the twist energy is released, and
the skis turn perpendicular to the direction of travel. The student has landed
on the rail (Figure 7C) with upper body counter-rotation to cancel the spin as
well as a slight semi A-frame stance. It should be noted that the skis are in a
slight “Daffy” position with the leading ski
7A 7B 7C
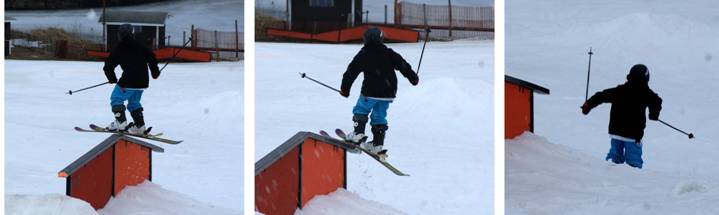
7D 7E 7F
Figure 7
tip angled upward, while the trailing ski tip is angled downward. This
helps steady the skier on narrow rails and reduces the chance of sliding off
before the exit. Figures 7D through F show an appropriate grind and good
landing. In Figure 8, the red arrows show the slight “Daffy” position with the
leading tip up and the trailing ski tip down. This forms an inverted V (dotted green
line) which tends to keep the skier on course, especially for long rails.
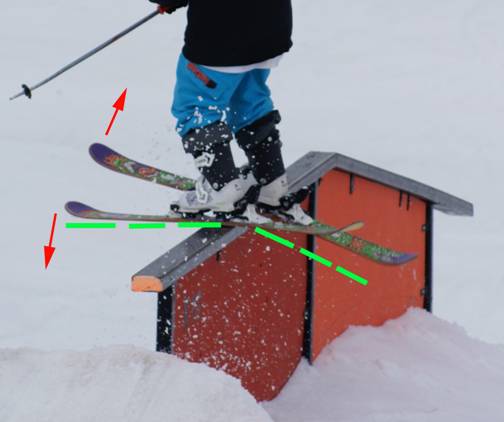
Figure 8
The gripping technique shown in Figure 8 can be
practiced statically on a small feature before trying it on a larger feature.
This gripping technique comes in handy on narrow rails.
MOVEMENT ANALYSIS
9A
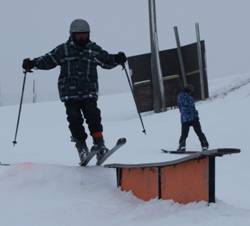
9B 9C
Figure 9
Figure 9 depicts typical difficulties
experienced by beginning freestyle rail skiers that can be addressed by
movement analysis and correction by the instructor or coach. In Figure 9A the
skier has mounted the rail with insufficient ski rotation and is performing a
crooked grind, which has caused him to slide off the feature. Review the exercises with counter-rotation
statically and well as dynamically over the practice rail. Emphasize that the
skis should be perpendicular to the rail. Make sure the student approaches with
the center of mass facing the end of the rail. If alignment is off, an early,
unintended departure from the rail is likely. In Figure 9B, the skier has
achieved the perpendicular position of the skis but is sliding off the rail.
This is typically a result of improper line up and not focusing on the end of
the feature. Practice line up with the rail with center of mass (belly button)
pointing toward the end of the rail. Speed may need to be increased if the
skier is traveling slowly on the rail. Figure 9C shows insufficient preparation
for rotating the skis 90 degrees to the direction of travel. Work on jumping to
the 90 degree position statically and over a small mogul. Make sure the pop is
just enough to mount the rail. Some students are intent on making a huge jump
but forget to rotate in preparation for the maneuver.
PROGRESSION RECAP
The following is a check-list for your rail grind lesson
plan:
1.
With boots only, practice rotary movement by jumping
(small jumps) onto a small practice rail and grind with the boot soles.
2.
With boots only, practice the semi A-frame stance.
3.
With skis on, hop onto a small practice rail with the
skis 90 degrees to the rail and hop off the end with the skis parallel to the
rail.
4.
In the terrain park, practice over a small wide rail,
perform movement analysis and provide feedback.
5.
In the park, practice on an intermediate narrow rail,
perform movement analysis and provide feedback. Introduce the gripping method
of holding onto a rail.
6.
Repeat the practice several times to anchor muscle
memory and gain confidence.
Enjoy the grind.
REFERENCES
1. “From the Jibbers Pocket,” 32
Degrees, Spring 2010, p14f.
2. Roberts, C., “A Moveable Feat:
3. Roberts, C., “Unwrap the Mysteries in Flat Box
Progressions,” The Professional Skier, Winter 2006, p36f.
 BACK TO ROBERTS SKI AND SNOWBOARD INSTRUCTION HOME PAGE